Wiimote -> OSCulator -> Kyma
In 2006, Nintendo introduced a game console called the Wii that comes with a motion-sensitive wireless Bluetooth controller called the
Wii Remote.
CamilleTroillard has added an extension to his Open Sound Control translation software,
OSCulator, enabling Macintosh users to receive acceleration information transmitted from the Wiimote, translated to OSC messages, and sent to Kyma where they can be used as live parameter controllers.
Here's a link to a short video showing some of the kinds of things you can do with Kyma, the OSCulator, and a Wiimote:
Wiimote->Osculator->Kyma (Large)
Wiimote->Osculator->Kyma (Medium)
Wiimote->Osculator->Kyma (YouTube)
The first step is to locate a Wiimote (with optional nunchuk and/or sensor bar), available from
http://store.nintendo.com, online stores like Amazon, or any other store that sells computer gaming consoles. You don't need the entire Wii console (although you may find yourself wanting one after you see people playing tennis with it); the Wiimote controller and optional nunchuk and sensor bar are sold separately. (As of this writing, the Wii Remote sells for around 40 USD, the Nunchuk is around 20 USD, and the Sensor Bar around 10 USD).
Next, download the
floatware application, OSCulator, from
http://www.osculator.net. There you'll also find Camille's step-by-step instructions on how to quickly and easily get the Wiimote talking to your Macintosh through Bluetooth and the OSCulator.
To get oriented (pun intended), try experimenting with these Sound examples (more to come!):
Once you have OSCulator running and receiving Bluetooth signals from the Wiimote, you can control parameters of Kyma Sounds by changing the orientation of the Wiimote and/or moving it in various directions at various accelerations.
In addition to triggers from the self-explanatory buttons on its surfaces, the Wiimote (and the Nunchuk) transmit measurements made by three accelerometers, each oriented in a different direction. (For the story behind the development of this low-cost three-directional accelerometer chip, see
the story behind the development of the chip). In Kyma, these measurements show up as controllers: !WiiAccelX, !WiiAccelY, and !WiiAccelZ.
When the Wiimote is resting on a table, you might expect all these acceleration values to go to zero, but instead you'll notice that one of them will be close to 0.2. The sensors inside the Wiimote are quite sensitive, and they are measuring all the forces exerted on them, even the big one we live with every day: gravity. In Kyma units, the acceleration due to gravity (1 G) is
0.2.
To get a feel for how the accelerometers work, imagine that each one is a spring or a
Slinky™. In a sense, the accelerometer is measuring how extended or opened-up the spring is. To imagine the effects of gravity on an accelerometer, picture holding a Slinky in different orientations. When you hold a Slinky by its top, the spring opens up and the bottom of the Slinky drops due to gravity. This would be measured as 1G. If you lay the Slinky on its side on a table so its top is on the right and bottom on the left, the spring does not open up (so the acceleration in this direction is 0). Likewise, if you rotate it on the table so the top is closer to you and the bottom is further away, the spring stays closed, so the acceleration due to gravity in this direction is also zero.
By observing which of the accelerometers are affected by gravity, you can tell how a Wiimote is oriented. As soon as you pick it up or swing it, you are exerting force on the Wiimote, causing it to accelerate. Your acceleration of the Wiimote is added to (or subtracted from, depending on the direction) the acceleration due to gravity.
Bear in mind that acceleration is not speed and it's not position. It's a measurement of the change in speed. For example, think about the gas pedal in your car. As long as you continue moving the gas pedal towards the floor, you are accelerating or changing speed. When you hold the gas pedal in a steady position, you are no longer accelerating but maintaining a constant speed. When you let up on the gas pedal, you are again changing speed (a negative acceleration). But merely looking at the gas pedal tells you nothing about the position of the car (at least not without some assumptions and a lot of calculations).
In practical terms, the acceleration envelopes themselves tend to be pretty short (it's hard to continuously change the speed of your arm!) So it can also be useful to measure the angle or direction in which the change is being made; these angles are called
Pitch,
Yaw, and
Roll (PYR).
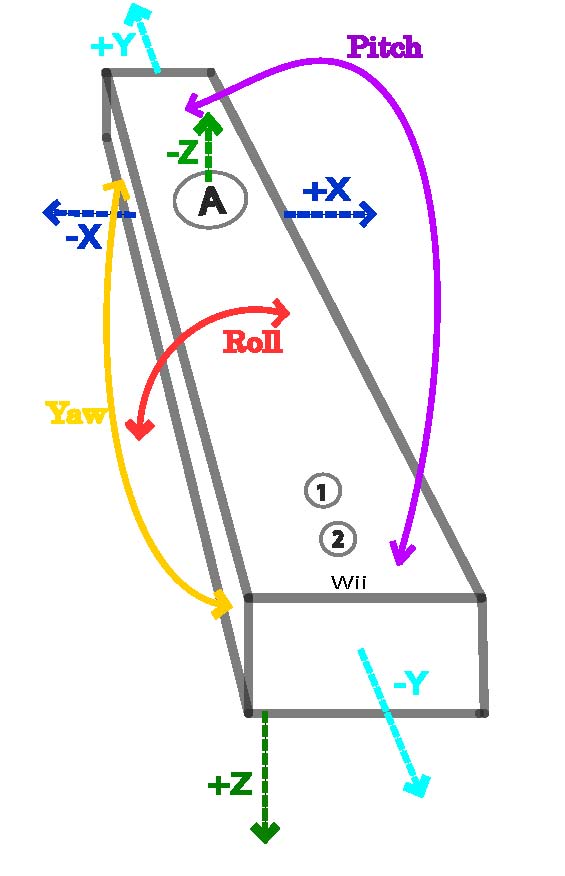
So what exactly do these nautical-sounding terms actually mean? A picture is worth a thousand words so here, thanks to
BrunoLiberda, is a diagram of the Wiimote with the angles and acceleration directions helpfully drawn-in:

Now that you've studied the picture, here are the thousand words anyway. Imagine you're an astronaut pilot executing
maneuvers on the Space Shuttle.
NASA asks you to adjust the Pitch. Imagine a wire running through the shuttle from the tip of the left wing through to the tip of the right wing; then imagine rotating around that axis, with the nose and the tail exchanging positions as you
pitch forward.

Next, NASA asks you to adjust the Yaw. Now you can imagine a pole from the floor of the shuttle up to the ceiling; then imagine the shuttle spinning around that pole like a top, so the nose moves to where the right wing used to be and the tail moves to where the left wing used to be and so on.

And finally, NASA asks you to adjust the roll: Imagine a wire running through the Shuttle from the nose to its tail; then imagine rotation around that axis, so the left and right wings alternate positions (like when a van gets into a side collision and rolls over and over).

When you are holding the Wiimote just imagine that the Wiimote is a toy space shuttle and you will have a perfect understanding of the Pitch, Yaw, and Roll (without the motion-sickness associated with an actual ride in the Space Shuttle).
In addition to its own X,Y,Z acceleration measures, the nunchuk controller also transmits an X and Y value (!NunJoyX and !NunJoyY) from a traditional joystick controller that you operate with your thumb.
You may have noticed that, at the front of the Wiimote, there is a darkened plastic window. Behind that window is a little infra-red camera. Nintendo also sells a Sensor Bar, a thin bar with a cluster of infra-red LEDs at each side. When you aim the Wiimote at this bar, the infra red camera inside the Wiimote forms an image of these two LED clusters as two points. The Wiimote uses the distance between these two clusters of LEDs as well as the distances of the LEDs from the edge of the image to compute where the Wiimote is pointing. For best results, position the Sensor Bar just above your computer screen, stand at least one meter away from the bar. Point at positions on your computer screen; if you limit yourself to pointing at the area of the computer screen, the Wiimote gives you fairly precise X and Y control values: !WiiBarX and !WiiBarY.
Note that the sensor bar is a
source of infra red, not an infra red sensor (the sensor is in the Wiimote), so in theory, you can use any two infra red sources, e.g. candles or certain halogen lights, spaced 7.5 inches or 15 mm apart.
(N.B. When you order the sensor bar from Nintendo, it comes with a proprietary power connector. To use the sensor bar standalone, slice off the end of the cord and solder a 2-pin connector on the end of it so you can plug it into a 7.5 V DC voltage supply (like the ones you can find at Radio Shack where you can select the voltage and polarity.
Alternatively, Nyko is offering a
battery-operated sensor bar that requires no slicing and splicing.
If you're eager to get out your soldering iron and modify an official Wii sensor bar, note that internal wires have some kind of colored enamel coating that you have to burn off by heating with the iron and tinning them before you can solder them. Here are some online descriptions of how to solder a new connector onto the end of the cord:
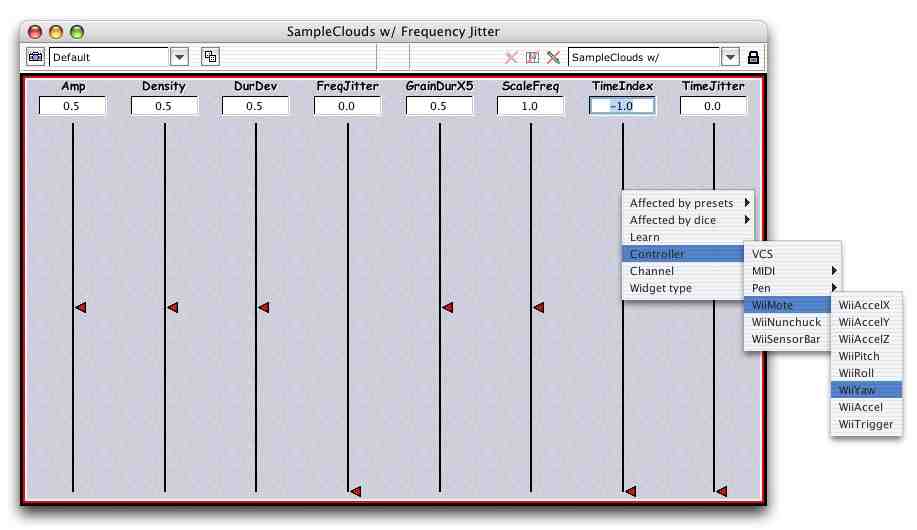
You can remap the control of any Sound parameter to the Wiimote by Ctrl+Clicking on it in the Virtual Control Surface and selecting one of the Wii controllers from a list.
For example, use Ctrl+B to find
SampleClouds w/ Frequency Jitter in the Prototypes, and play the Sound. In the VCS, Ctrl+Click on
TimeIndex and select !WiiYaw as the controller.

You can also use the following hot values directly or as part of a
CapyTalk expressions in a parameter field of a Sound. (The range of each hot value as assigned in the default global map is listed in parentheses following the hot value's name):
| !WiiAccelX | (-1,1) |
| !WiiAccelY | (-1,1) |
| !WiiAccelZ | (-1,1) |
| !WiiPitch | (-1,1) |
| !WiiRoll | (-1,1) |
| !WiiYaw | (-1,1) |
| !WiiAccel | (0,1) |
| !WiiBarX | (0,1) |
| !WiiBarY | (0,1) |
| !WiiTrigger | (0,1 grid: 1) |
| !WiiButtonB | (0,1 grid: 1) |
| !NunAccelX | (-1,1) |
| !NunAccelY | (-1,1) |
| !NunAccelZ | (-1,1) |
| !NunPitch | (-1,1) |
| !NunRoll | (-1,1) |
| !NunYaw | (-1,1) |
| !NunAccel | (0,1) |
| !NunJoyX | (-1,1) |
| !NunJoyY | (-1,1) |
| !NunTriggerC | (0,1 grid: 1) |
| !NunTriggerZ | (0,1 grid: 1) |
--
CarlaScaletti - 31 Mar 2007
A place to share your experiences, tips, and tricks for working with the Wii controllers
...it has quite a good range so you can work off stage to start things which is fun also.
--
GarthPaine - 1 Apr 2007
Nyko, makes an ecological recharging station for the wiimote that you can order here
http://www.nyko.com/nyko/products/?i=102
--
StephenDavidBeck - 6 Jun 2007