If the Sound has a parameter called Trigger or Gate, you can trigger the Sound by changing the value of that parameter from 0 to 1 (actually to any number greater than 0). Some examples of ways to do this with CapyTalk and pasted Sounds:
Use a MIDI keyboard event:
!KeyDown
Use a MIDI switch
!sw01, !Gate, etc.
Use any hot value and change it into a button in the Virtual Control Surface
!AnyNameHere
Use a metronome (e.g. the expression below creates a trigger once per beat at the rate set by the BPM fader)
1 bpm: !BPM
Use the tick expression (e.g. the expression below creates a trigger once every 5 seconds)
5 s tick
Use a logic test (e.g. the expression below has a value of 1 whenever the incoming MIDI notenumber equals 60)
!KeyNumber eq: 60
Paste a Sound into the field
For example, find the PulseTrain in the Prototypes; copy it; paste it into the Trigger or Gate field (The PulseTrain changes from 0 to 1 at a regular rate)
If the Sound doesn't have a Trigger or Gate parameter, you can multiply it by an amplitude envelope. For example, if you are in the Sound editor and want to apply an amplitude envelope to targetSound:
Find AR Drag&Drop in the Prototypes
Drag it onto the line coming out of targetSound (to the right of targetSound) and drop it
NB: Do not drop it onto the plus sign (+) icon as that will create a Mixer; drop it onto the line instead
The result is a Product of targetSound and AR. AR has a Gate field, so you can create a trigger using CapyTalk or by pasting a Sound into the field.
Simply type an exclamation point (!) into a parameter field. Any name you type after an exclamation point will become the name of a fader in the Virtual Control Surface the next time you play that Sound.
Behind every Sound, there is an algorithm. This is the procedure for putting the Sound together. Some of the numbers used in this algorithm can be adjusted to affect the way the result sounds or the way it responds to inputs or controls. These are the parameters of that algorithm. In Kyma, the only parameters you see are the ones you can adjust (but there are also other parameters behind the scenes). Parameter fields with a white background are constant values; parameter fields with a light blue background can take CapyTalk expressions, allowing you to change them while the Sound is playing.
By analogy, imagine that you have a recipe giving you step-by-step instructions for how to combine ingredients in a bowl, when to add the liquid ingredients, how long to mix them, when to transfer the mixture into a pan and the pan into the oven, and what to do with the results that you remove from the oven. That is the algorithm. The parameters of the cooking algorithm would be things like the amount of each ingredient, the temperature of the oven, and the duration of the cooking time. Some of these amounts are variable (e.g. "salt to taste") and sometimes the ingredients themselves are variable ("substitute blueberries for applies if you prefer").
Here's the Wikipedia definition for Parameter.
A Kyma Sound can be roughly categorized as either a source, a modifier, or a combiner. A modifier (e.g. a Filter) has one input, a combiner (e.g. a Mixer) has two or more inputs, and a source (e.g. a Sample) has no inputs. (Actually, any Kyma Sound can function as a source, but there are some simple sound sources don't have any inputs).
To route any Sound through a modifier:
Open a Sound editor on the modifier by double-clicking its name or icon. The modifier will already have a default input.
Drag any Sound into the editor and drop it onto the _modifier_'s default input (replacing the current input with your new Sound)
To add anySound to the inputs of a combiner:
Open a Sound editor on the combiner and double-click its icon to show its parameter fields
Drag any Sound into the editor and drop it into the Inputs parameter field of the combiner.
To add a new Sound as a new branch in parallel with an existing Sound:
Drag the new Sound into the Sound editor and drop it onto the plus sign (+) to the right of the existing Sound
This automatically creates a Mixer with the existing Sound and the new Sound as its inputs
In Kyma you are always manipulating the Sound modules, not the lines connecting the modules together. The process of Sound editing in Kyma is one of modifying or expanding an existing Sound, rather than building up a new Sound from nothing.
Kyma > Kyma Sound Library contains over a thousand examples you can use as starting points.
To see the contents of a folder or a file, click once on the triangle to the left of the file or folder name.
To listen, select a Sound and press the space bar
To edit, double click on the name of the Sound or other kind of file.
On the web:
tweaky不hare is a repository of Sounds, Timelines, expressions, Tools, and other sound design ideas contributed by Kyma users. Each item includes a Discussion link with an explanation and an opportunity to ask the designer questions about the Sound).
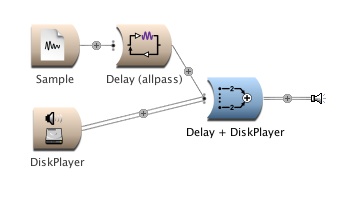
For example, say you had the following Sound and you wanted to hear the DiskPlayer straight and also through the delay.
To connect DiskPlayer to both the Mixer and the Delay:
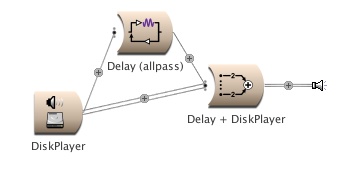
Double-click Delay (Allpass) to reveal its parameters
Find the Input field (located at the lower left corner of the parameter fields)
Hold down the Option key and dragDiskPlayer from the signal flow graph into the Input field parameter
When it asks you whether to replace Sample, say yes.
Double-click in the white area of the signal flow graph to update the display
Give it the same name in each of the parameter fields you want to control. For example, if you use !Frequency in 3 different Sounds, feed them into a Mixer, and play the Mixer, you will see a singleFrequency fader in the Virtual Control Surface. That single fader controls the frequency of all three Sounds.
Let's say you have an adjustable value called !Fader and you want its value to range from 50 to 100 in steps of 1. There are two different ways you can accomplish this: one is to change the range and grid of the fader in the Virtual Control Surface, and the other is to use a CapyTalk expression in the parameter field to modify the value arithmetically.
Using the Virtual Control Surface (VCS):
Play the Sound
Unlock the VCS to open a small Virtual Control Surface Editor window
In the VCS, double-click the fader whose range you want to change
Find Min / Max / Grid in the Virtual Control Surface Editor window
Enter the smallest value (50), the largest value (100), and the grid or the smallest change in value: 1.
OR, you can use a CapyTalk expression in the parameter field:
Multiply the expression by the range: max - min (In this case, it would be 100 - 50)
Add the minimum (In this case, it would be 50)
Round or truncate the result to get the step or grid of 1.
Drag a Sound (from the Browser, Prototypes, Sound File Window or a different Sound editor) into the Sound Editor and drop it onto the icon of the Sound you want to replace, OR
Select and Copy a Sound (in the Browser, Prototypes, Sound File Window or the Sound Editor); then select the Sound you wish to replace, and Paste.
Edit>Paste special pastes the exact same Sound.
A normal Paste pastes a copy of the Sound.
In the Sound Browser
Select the replacement Sound.
Click the repacement input button at the top of the Sound Browser. The name of your replacement Sound will appear in the text window to the right of that button.
In the Browser, select one of the Sounds with a green arrow to the left of its name.
When you Play, your input will be used in place of the Sound's default input.
To save the Sound with your substitute input, drag it from the Sound Browser into a Sound File Window (and save the Sound File window to disk).
In the Timeline
Option+Drag a Sound (from the Browser, Prototypes, Sound File Window or Sound editor) into the Timeline and drop it onto the Sound whose input you want to replace
You can not. Synchronise Kyma to your DAW using MTC. Send it Midi notes. You can always load a midi file into the Midivoice prototype to play it back!
-- CharlieNorton - 17 Mar 2010