kyma•tweaky . Learn . SettingUpPacarana

Setting up your Paca(rana) to use with Kyma

Preparing your Computer

Kyma X requires Mac OS X 10.4 or newer, or Windows XP with Service Pack 3 (or newer). Before installing Kyma, please use Software Update from the Apple menu on the Mac, or Windows Update from the All Programs menu in the Start menu on Windows, to download the latest updates and patches from Apple and Microsoft, respectively.

Kyma occupies approximately 875 megabytes of space on your hard disk and requires about 256 megabytes of RAM to operate. Your computer will need more RAM if you plan to use Kyma simultaneously with other software.

If you already have Kyma installed on your computer, change the name of the folder that contains Kyma before installing the newer version. When you have finished installing the new software, move any files that you have created or changed from the old Kyma folder into a new folder, and place that new folder into the new Kyma folder. Finally, backup and delete the old Kyma folder.

Installing the Software

ALERT! Be sure to install the Kyma software before connecting the Paca(rana) to your computer.

Connecting the Hardware

Supplying Power to the Paca(rana)

ALERT! Never connect the external power supply to the Paca(rana) when the external power supply is powered on.

Connecting:

  1. Connect the external power supply to the Paca(rana) power socket
  2. Connect the AC power cable to the external power supply
  3. Connect the AC power cable to a grounded AC mains power outlet

Disconnecting:

  1. Disconnect the AC power cable from the AC mains power outlet
  2. Disconnect the AC power cable from the external power supply
  3. Disconnect the external power supply from the Paca(rana) power socket

IDEA! No matter which country you are in, the Paca(rana)’s external power supply automatically configures itself for the AC mains power to which it is connected.

DONE Make sure that the Paca(rana) and the computer (and any other peripherals you are using with Kyma) are connected to the same outlet strip for your own safety and to avoid ground loops.

DONE When powered on, the Paca(rana), like many computers and electronic devices, can get very warm. Do not block the ventilation holes in the top or rear panels of the Paca(rana) or set anything on top of the Paca(rana).

Connecting the Paca(rana) to your Computer via FireWire

ALERT! Try to avoid plugging or unplugging the FireWire cables when your computer or Paca(rana) are powered on.

ALERT! When plugging in the FireWire cable, make sure that the cable is connected in the correct orientation — plugging it in upside down will destroy the Paca(rana) FireWire interface and/or the computer’s FireWire interface!

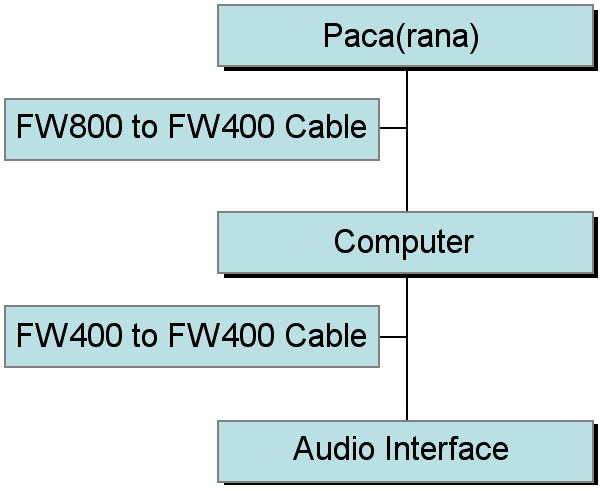
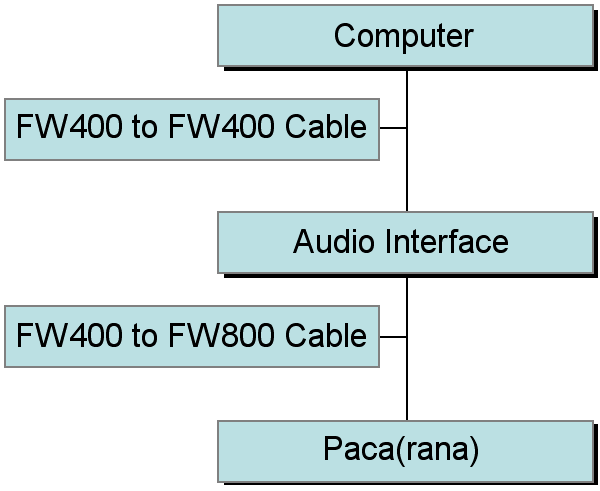
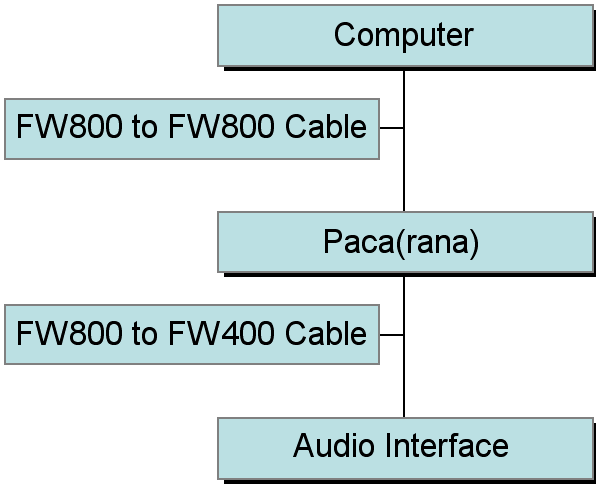
Use the supplied FireWire cable (or one of your own) to connect the Paca(rana) to your computer. (See the suggested configuration drawings, below.)

fw3.png fw2.png fw1.png

ALERT! If your computer has more than one FireWire bus (for example, when you have added a FireWire adapter to a computer that has built-in FireWire), make sure that the Pacarana and its FireWire audio interface are connected to the same bus.

ALERT! All FireWire 800 connectors are sensitive to pressure and cable movement. The FireWire cable should plug straight into the connector on the back of the Paca(rana) and the cable should not have any tension on it. The FireWire connection can be unreliable if the cable connector is at an angle to the Paca(rana) connector or if there is any pressure applied to the connector. If necessary, consider using a right-angle cable (such as the ones found at USBFireWire.com) when space is tight at the back of the Paca(rana).

IDEA! You will get the highest performance out of Kyma (faster communications and faster downloading of Sounds and samples) if you connect the Paca(rana) directly to a FireWire 800 port on your computer.

DONE The two FireWire ports on the Paca(rana) are connected to each other only when the Paca(rana) is turned on.

IDEA! See also Tips for FireWire bliss...

Connecting and Configuring Audio and MIDI Interfaces

For sound output, you will need a compatible USB or FireWire audio interface, an audio amplifier, and speakers or headphones. If you would like to use an analog input with a microphone, you may need a preamplifier. To use a MIDI input or output device, you will need a compatible USB or FireWire MIDI interface, (many audio interfaces include a MIDI interface).

For audio and MIDI communication, there are two FireWire 800 ports and two USB ports on the back of the Paca(rana).

If you have a USB audio and/or USB MIDI interface, connect it to one of the USB ports on the back of the Paca(rana).

In an earlier step, you connected the Paca(rana) to your host computer so that Kyma (running on the host) can communicate with the Paca(rana). Since the host and the Paca(rana) are already connected to the FireWire bus, you can put the FireWire audio interface anywhere on that bus. For example, you could connect the interface to the FireWire 400 port on your computer. Or you could connect it to one of the ports on a FireWire disk drive connected to the FireWire 400 port of your computer.

IDEA! Ideally, you should put all FireWire 800 devices on one branch of the bus and all the FireWire 400 devices on the other branch. The host computer and the Paca(rana) will be able to find all devices on the bus, but each branch can run at its own maximum speed.

IDEA! When using a FireWire audio interface, we recommend connecting the interface's power adapter rather than relying on FireWire bus power. Certain combinations of computers, cables, and audio interfaces will not operate reliably from bus power.

In FireWire audio streaming protocols, an audio interface can receive digital audio from only one source at a time. If you have the audio interface's driver installed on your host computer, the host computer automatically becomes the audio source for that interface. In order to allow the Paca(rana) to use the audio interface, the interface's driver should be uninstalled or disabled on the host computer (or never installed in the first place). This allows the Paca(rana) to act as the source of audio for the audio interface.

For details on how to connect specific audio and MIDI interfaces to your Kyma System, please consult the following links.

ALERT! If you do not see your audio or MIDI interface in the list below, it is unlikely to work with the Paca(rana).

IDEA!Here are some example real world configurations contributed by fellow Kyma users.

Starting up and Shutting Down Kyma

Please use the following procedure for starting up Kyma:
  1. Start up your computer (but leave Pacarana OFF).
  2. Turn on audio interface, wait for it to complete its start-up sequence.
  3. Power up the Paca(rana) by lightly touching the front panel strip.
  4. Wait for the Paca(rana) to display its menu.
  5. Start up Kyma.
  6. Follow any firmware update instructions that Kyma may give you.
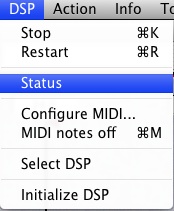
  7. Use Status from the DSP menu to select the desired audio and MIDI interfaces (see below).

Please use the following procedure for shutting down:

  1. Quit Kyma.
  2. Power down the Paca(rana) by lightly touching the circle on its touch strip for three seconds.

ALERT! If the front panel is showing the 'drunken butterfly', shoo it away first before touching and holding the circle to shut down. In other words, touch or wave your hand in front of the display to exit the screen saver first; then touch and hold the circle and watch for the countdown "3, 2, 1". (If the count down starts at "5", then the Pacarana will shut down, but it will not properly disconnect from its audio interface.

  1. Wait for the Paca(rana) to fully power down (the quote is displayed and the fan turns off).
  2. Turn off the power to your audio interface.
  3. Shut down your computer.

Selecting and Controlling External Audio and MIDI Interfaces in Kyma

You can have any number of audio and MIDI interfaces connected to your Paca(rana) and you can use one device as the source of both MIDI and audio, or you can use one device as a source of MIDI and another as a source of audio. For example, you may prefer to use a FireWire audio interface in combination with a USB MIDI keyboard controller. Or you may prefer to use one of the combination audio-and-MIDI devices to handle both audio and MIDI over FireWire (or USB). Or you may choose to have several USB MIDI controllers on the bus and select between them in Kyma. Or you might use a large FireWire interface in your studio and a pocket-sized USB interface when on the road.

Once you’ve connected a FireWire or USB interface to the Paca(rana), you can select and configure the interface using Kyma’s DSP Status window (or the Setup menu on the front panel of your Paca(rana)).

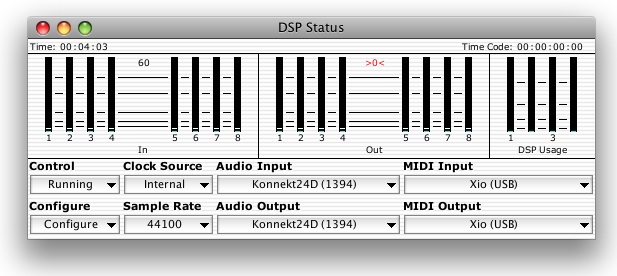
To open the DSP Status window in Kyma, go to the DSP menu and select Status.

DSPMenu.jpg

You can select and configure your FireWire and USB interfaces using the drop-down menus in the lower section of the DSP Status window
DSPStatusWindow.jpg

For example, to see a list of all audio interfaces connected to your FireWire bus, click the menu labeled Audio Input. You can select a different audio interface by selecting another device from this list. The very first time you start Kyma (or when you reset Kyma's preferences by holding down the CapsLock key while Kyma is starting up), the selected device will be Silent Device. You can also select Silent Device when no devices are connected but you still want to play Sounds and look at them on the oscilloscope or edit a Virtual Control Surface. Silent Device is automatically selected when no audio interfaces were detected or when the device you have selected could not be initialized for some reason.

When you first connect a new device to the USB or FireWire bus, you should select Rescan from the Control menu to update the list of selectable devices.
IDEA! The Paca(rana) can withstand most FireWire and USB bus resets, but if you want to play it safe, select Halt from the Control menu before plugging or unplugging any device.

To route the virtual inputs or outputs of Kyma to or from the physical inputs and outputs of your converter, use the Configure menu.

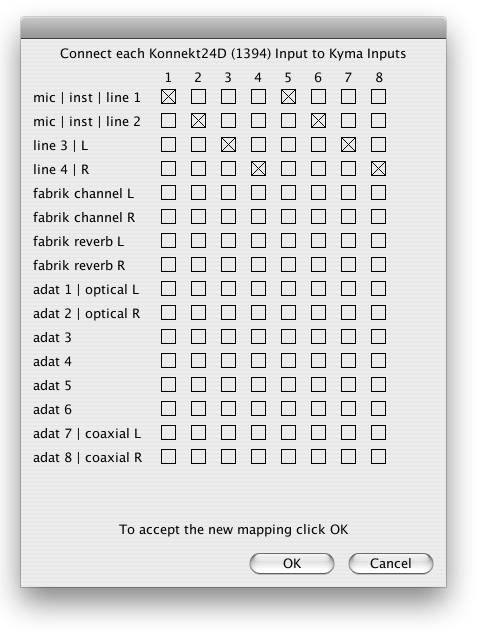
Select Route inputs from the Configure menu to associate each physical input on your audio interface to any number of Kyma virtual inputs. For example, if you had a TC Electronic Konnekt 24D selected as your audio interface and you wanted to route mic | inst | line1 to Kyma’s inputs 1 and 5, the routing window would look something like this:

routeinputs.jpg

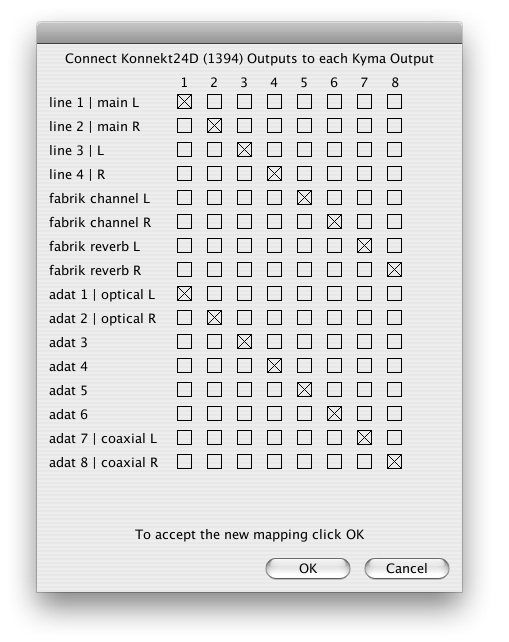
To send each of Kyma’s virtual output channels to any number of physical output channels on your audio interface, select Route outputs from the Configure menu. For example, if you had a TC Electronic Konnekt 24D selected as your audio interface and you wanted to route Kyma’s outputs 1 through 8 to the Konnekt’s audio outputs 1-8 and ADAT outputs 1-8, the mapping window would be:
routeoutputskonnekt24.jpg

How to change the sample rate when Kyma's interface is not the clock source

  1. In Kyma, select Internal Clock Source.
  2. In Kyma, select the new Sample Rate.
  3. On the other interface, select the new Sample Rate.
  4. I think there is a locked clock indicator on the Konnekt 48; if so, wait for it to indicate that it has synchronized to the other interface.
  5. In Kyma, select ADAT Clock Source.

Troubleshooting

On Windows computers, Install new hardware dialog box repeatedly popping up

Try to avoid going from FW400 (audio interface) up to FW800 (Pacarana), and then back to FW400 (computer). Instead, route from Pacarana->Audio Interface->Computer. This way there is only one FW speed conversion.

Kyma cannot locate the Paca(rana) or the Paca(rana) cannot find the audio interface

We have had two reports of problems when one of the Paca(rana) FireWire ports is directly connected to the the computer's FireWire 800 port and the second Paca(rana) port is directly connected to an audio interface's 400 port. If this occurs, try moving the audio interface connection to your computer's 400 port or to one of the devices that is connected to the computer's 400 port.

----- Revision r1.41 - 02 Jul 2013 - 23:06 GMT - CarlaScaletti
Copyright © 1999-2014 by the contributing authors. All material on this collaboration platform is the property of the contributing authors.
Ideas, requests, problems regarding kyma•tweaky? Send feedback.